> For the complete documentation index, see [llms.txt](https://docs.bluebubbles.app/private-api/llms.txt). Markdown versions of documentation pages are available by appending `.md` to page URLs; this page is available as [Markdown](https://docs.bluebubbles.app/private-api/building-and-contributing.md).
# Building and Contributing
Here's how you can build or contribute to the project
## Build Instructions
### Pre-Requisites
1. macOS device with Xcode and working iMessage
2. Apple Developer account with valid Team ID
3. Complete the [Installation](/private-api/installation.md) instructions (you don't need to install the stable bundle file, since Xcode will overwrite it with your built version)
4. Clone the [repo](https://github.com/BlueBubblesApp/bluebubbles-helper) to your macOS device
{% hint style="info" %}
You do not need to pay the $100 fee for the Apple Developer account. As soon as your account is approved after the initial creation, you should be able to access your Team ID from within Xcode.
{% endhint %}
### Instructions
1. Open the `MacOS-xx` folder (where xx corresponds with your current macOS version) within the cloned repository files
* i.e. `Messages/MacOS-11+`
* i.e. `Messages/MacOS-10`
* ie. `FaceTime/MacOS-11+`
2. Open up `Terminal` and navigate to the same directory
3. Run `pod install`
* This should install the the dependencies for the project
4. Using finder, double click `BlueBubblesHelper.xcworkspace` to open inside Xcode
* **Make sure you do not open the `BlueBubblesHelper.xcodeproj` file**
5. Select the `BlueBubblesHelper` project header in the primary side bar\

6. Select the `BlueBubblesHelper Dylib` target (building icon) in the secondary sidebar. Then go to the `Build Phases` tab and expand the `Copy Files` section. Edit the `Path` to be where you want the dylib to output to.\
\
It's recommended that you set the path to be in the `appResources` of your BlueBubbles Server source code, for instance: `/{path_to_your_code}/packages/server/appResources/private-api/macos11`
7. Select the `BlueBubblesHelper` target (blue block icon) in the secondary sidebar\

8. Select the `Signing & Capabilities` tab and sign in (or select) your Developer account
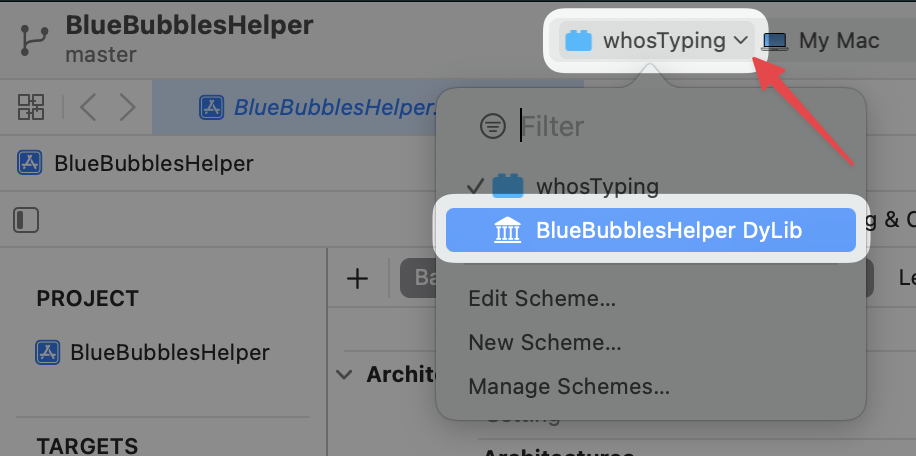
9. Ensure that you have the `BlueBubblesHelper Dylib` selected as the build target
10. Now, you are ready to build. Just hit the play button, and the dylib will be built, outputting to the proper location within the BlueBubbles Server source code (appResources). The Messages app will be killed, which will prompt the BlueBubbles Server to restart the Messages app with the new dylib build.
## Common Issues
> ld: library 'CocoaAsyncSocket' not found\
> clang: error: linker command failed with exit code 1
This means you've done either of the following:
* You have not run `pod install` within the `MacOS-XX` folder of the cloned repository
* You opened the `BlueBubblesHelper.xcodeproj` file instead of the `BlueBubblesHelper.xcworkspace` file
> PhaseScriptExecution failed with a nonzero exit code
This error means that the `Build Phase` -> `Run Script` configuration for your target errored out.
This is likely due to the `killall Messages` command failing (throwing an error) because the Messages app is not running.
To fix it, change the script to be `killall -q Messages` which should allow it to return 0 for the exit code. If that doesn't work, try `killall -q Messages; exit 0;`
## Contributing
Hey there, and welcome! We are always eager to have new contributors working on our projects. First and foremost, we recommend joining our [Discord](https://discord.gg/sccHbCgh) as that is the best place you can get in touch with the main developers to discuss new features, ideas, or changes you're planning to make. Now, on to the guide...
{% hint style="warning" %}
The Helper Bundle is quite challenging to get a hang of. The reason for this is because none of the internal iMessage Framework methods are commented or documented in any way. The only reasonable method of development is to make educated guesses and brute-force until you find something that works.
As a result, we highly recommend that you have a working knowledge of Objective-C and/or reverse-engineering/tweak development before attempting to work on the bundle.
{% endhint %}
### Terms / Words to Know
The Helper Bundle development is filled with some jargon that might appear confusing at first. Here are some commonly used terms and what they refer to.
* IMCore - The iMessage internal framework on macOS. This can be found at `/System/Library/Private Frameworks/IMCore.framework`, but it requires a classdump tool to actually view the header files inside the framework.
* IMSharedUtilities - A utility framework for iMessage. This is also found in the same `Private Frameworks` directory.
* Barcelona - This is Eric Rabil's wonderful REST API for iMessage built entirely on IMCore. Much of our own code has come from looking at [his repo](https://github.com/open-imcore/barcelona) and borrowing bits and pieces to make our integrations work.
* Console - This refers to the macOS Console app, which is our main tool for debugging the bundle. You will notice that `BlueBubblesHelper.m` has quite a few `DLog` statements. These print logs to the `system.log` tab of the macOS Console on newer macOS versions, while older macOS versions will print these logs to the standard `Console` tab.
* classdump - This is the process of dumping header files on macOS. As mentioned above, we use this tool to view the header file code which is otherwise hidden from users.
### Contribution Guide
* Write clean, readable code. Make sure to add comments for things that might seem out of place or strange at first glance.
* Do not edit any `.h` files without consulting a main developer. Most of your changes will only happen in the `BlueBubblesHelper.m` file, as its the one that calls the IMCore header functions.
* Testing is key. There are so many variables when it comes to adding new functionality. Make sure your code is safe, typed, and works in a variety of different cases.
### Contribution Resources
1. [Tweak Development Wiki](https://iphonedev.wiki/index.php/Main_Page) - if you are new to reverse engineering, this may be a helpful resource.
2. [w0lfschild macOS Headers](https://github.com/w0lfschild/macOS_headers) - pre-dumped headers for macOS Big Sur and up **only**. If you are developing for Catalina and under, you will need to dump headers on your own machine, using the next tool.
3. [Steve Nygard class-dump](http://stevenygard.com/projects/class-dump/) - macOS 10 only, [freedomtan classdump-dyld](https://github.com/freedomtan/classdump-dyld/) - macOS 11 only.
Currently there is no classdump tool that we know of which works on macOS Monterey. However, all Big Sur header files should work fine on Monterey machines.
4. [dyld\_shared\_cache\_util](https://lapcatsoftware.com/articles/bigsur.html) - open-source tool from Apple that also dumps headers on macOS 11. This has not been tested by any developers as of yet, but may be a good alternative to freedomtan's classdump-dyld fork.
5. [ZKSwizzle](https://github.com/alexzielenski/ZKSwizzle) - this tool is already built into the bundle. You can use it to "intercept" Objective-C method calls and see what arguments are passed to them.
### Enable Private Logs
Often times, you may try to log some data out to the Console App, however, the log shows as ``. This is because your Mac's `Enable-Private-Data` setting defaults to `false`. In order to turn it on to allow private logging, please install the following MacOS Profile:
{% hint style="info" %}
Once downloaded, just double-click the profile to install it. However, since the profile no longer has a valid signature, you will need to open your `System Preferences` app, then search `Profiles` and manually install the profile.
{% endhint %}
{% embed url="" %}
### Development Process
The following will attempt to outline how our development process runs from start to finish when adding a new feature to the bundle.
1. Is the feature reasonable to implement and can we get it to work cross-platform with all clients? Will we be able to send the required data to the bundle from the server app?
This step is important to ask yourself. Ultimately the bundle is meant to be a companion to the server and clients, since it can't be used as a standalone app. We have to make sure the feature is reasonable in scope and can actually be implemented on clients.
Consider the limitations that the bundle has, especially in communication with the server. We can only send and receive primitive types from both ends, so data must be serialized and sent.
2. Now for the hard part - finding out which methods and what arguments we need to generate so iMessage does what we want. This step takes the longest by far, and we recommend using the above resources to speed things up a bit.
1. Sometimes, you may need to add header files to the Bundle, because the functions you need are in a new file that we haven't added yet. To do this, create a new `.h` file in the same directory as the others, with the same filename as the file in the `IMCore` or `IMSharedUtilities` frameworks.
2. If you created files in step 1, make sure to import them inside `BlueBubblesHelper.m`.
3. At the bottom of the `initializeNetworkConnection` function inside `BlueBubblesHelper.m`, we have some commented out lines of code. These are what we use when developing new integrations. Essentially, the `handleMessage` function is called with "fake data" that we provide to simulate a server-side message. This code will be called around 5 seconds after the bundle is installed, as soon as it has made a connection with the server app, and is the best way to automate your testing process.
4. Keep testing until you've got code that works!
3. By this point, you should have working code for your feature. Congrats! The next step is to make sure your code is clean, safe from exceptions, typed properly with correct arguments, and can send correctly-formatted data back to the server, when applicable. We encourage that you comment your code as well.
4. You probably only developed the integration inside the folder for your macOS version, whether that be `10` or `11+`. If the iMessage feature is not version-specific, we also need to add your code to the other folder's `BlueBubblesHelper.m` file. You have 2 options:
1. Make a VM on your macOS device following the guide for the OS you need: [Big Sur](https://travellingtechguy.blog/macos-big-sur-on-vmware-fusion-12/) or [Catalina](https://travellingtechguy.blog/vmware-dep/). We highly recommend using a burner Apple ID on these VMs just in case Apple has a bad mood when you make the VM.
2. Reach out to a main developer (Tanay has a Catalina and Monterey VM on his Big Sur Mac), and they can add / test your code on the other macOS folder.
5. Make a PR :)
{% hint style="danger" %}
Exceptions in the bundle are very, very bad. As you might find in your testing, exceptions will crash the entire bundle and iMessage process, which breaks Private API until iMessage is restarted. As a result, it is extremely important that your code is as safe as possible - check for null, check for types, etc.
If you get an exception while developing, take a look at the report that's generated. The line numbers/stacktrace won't be helpful, but the actual error message may help you find the source of the problem.
{% endhint %}
---
# Agent Instructions
This documentation is published with GitBook. GitBook is the documentation platform designed so that both humans and AI agents can read, navigate, and reason over technical content effectively. Learn more at gitbook.com.
## Querying This Documentation
If you need additional information that is not directly available in this page, you can query the documentation by asking a question.
Perform an HTTP GET request on the following URL with the `ask` and `goal` query parameters:
```
GET https://docs.bluebubbles.app/private-api/building-and-contributing.md?ask=&goal=
```
`ask` is the immediate question: it should be specific, self-contained, and written in natural language.
`goal` is what the user is ultimately trying to achieve, the reason they need the answer. Sharing it helps GitBook give you a better, more relevant answer. A goal is most helpful when it describes the outcome the user wants rather than restating the question. For example, with `ask=how do I create an API token`, a goal like `automate deployments from our CI pipeline` lets GitBook tailor the answer to that use case.
The response will contain a direct answer to the question and relevant excerpts and sources from the documentation.
Use this mechanism when the answer is not explicitly present in the current page, you need clarification or additional context, or you want to retrieve related documentation sections.